Building SAP Fiori List Report Applications with SAP Build: The Modern Approach (2025)
Originally published 2022 | Major update October 2025
In my previous blog, I walked you through creating CDS Views using HANA Studio and Eclipse. Today, I’ll show you how to leverage those CDS views to build powerful SAP Fiori List Report applications—but with a major shift in approach that reflects where SAP development is headed in 2025 and beyond.
The Game Has Changed: While traditional development environments like SAP Business Application Studio still exist, SAP Build represents SAP’s strategic direction for application development. Even more exciting, SAP Build now enables developers to use modern AI-powered IDEs like Cursor, Visual Studio Code, and GitHub Copilot to build SAP applications with intelligent agents that understand your business context.
This guide focuses on the modern, AI-enabled approach while covering the traditional methods for those maintaining existing systems.
What is a Fiori List Report Application?
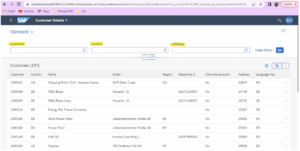
The SAP Fiori List Report is a standard SAP Fiori floorplan that displays large datasets in an intuitive, enterprise-ready interface. It provides professional functionality without extensive coding:
- Smart filtering and search with AI assistance
- Dynamic sorting and grouping
- User personalization and variants
- Export to Excel and other formats
- Responsive design across all devices
- Seamless navigation to detail views
The power of Fiori elements is that these features come pre-built. You focus on defining what to display through annotations and metadata, not how to build the UI.
Why SAP Build is the Strategic Path Forward
SAP Build fundamentally transforms how organizations create SAP applications. Here’s why it matters:
Low-Code + Pro-Code Flexibility
SAP Build isn’t just for citizen developers. It combines:
- Visual development for rapid prototyping and business user empowerment
- Pro-code capabilities for developers who need full control
- Seamless switching between low-code and pro-code as needed
AI-Native Development
SAP Build integrates AI throughout the development lifecycle:
- Joule copilot assists with code generation and application logic
- Natural language commands to create UI elements
- AI agents that execute complex development tasks
- Context-aware suggestions based on your SAP data model
Modern IDE Integration
This is game-changing: SAP Build now works with modern AI-powered IDEs that professional developers prefer:
- Cursor with its advanced AI pair programming
- Visual Studio Code with GitHub Copilot
- SAP Business Application Studio for cloud-native development
- Direct integration with AI agents that understand SAP business context
Imagine using Cursor’s AI to write SAP CAP services or Fiori annotations while the AI agent has full context of your CDS views, OData services, and business logic. That’s the reality in 2025.
Unified Platform
SAP Build on SAP BTP provides everything in one place:
- SAP Build Apps – Create pixel-perfect Fiori applications
- SAP Build Code – Pro-code development with AI assistance
- SAP Build Process Automation – Automate workflows
- SAP Build Work Zone – Deploy to a unified digital workplace
Prerequisites
Before we begin, ensure you have:
- Created CDS views (see my previous blog)
- Access to SAP Build (via SAP BTP account)
- Connection to your SAP backend system
- Optional: Cursor or VS Code with SAP extensions for AI-assisted development
We’ll use the CDS views ZXC_CUSTOMER and ZXC_CUST_SD from the previous tutorial.
Step 1: Exposing CDS Views as OData Services
First, expose your CDS view as an OData service. This process remains consistent across development approaches.
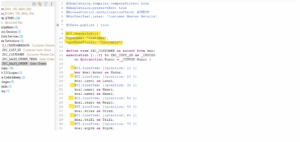
Adding the OData Annotation
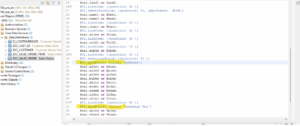
Open ZXC_CUSTOMER in your IDE and add this annotation before the view definition:
@OData.publish : true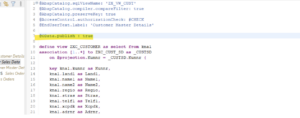
Pro Tip: If you’re using Cursor or VS Code with SAP extensions, the AI can suggest this annotation automatically when you describe wanting to expose the view as an OData service.
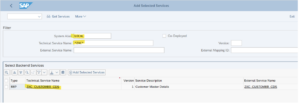
Registering the Service
Register your OData service in the SAP Gateway:
- Open transaction /N/IWFND/MAINT_SERVICE
- Click Add Service → Search
- Find and select your service
- Set System Alias to Local
- Use package $TMP for development
- Complete the registration
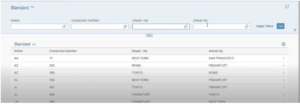
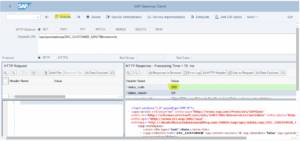
Verify the Service
Test the connection using SAP Gateway Client. Execute the service and confirm you receive XML/JSON data back.
Step 2: Creating Your Application with SAP Build
The SAP Build Approach (Recommended)
SAP Build dramatically simplifies Fiori application creation. Here’s the modern workflow:
- Launch SAP Build from your SAP BTP cockpit
- Open SAP Build Apps or SAP Build Code depending on your preference
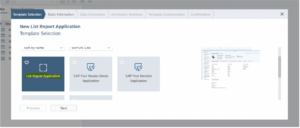
- Use the Fiori elements template wizard
- Select List Report with Object Page
- Connect to your OData service (ZXC_CUSTOMER_CDS)
- Let AI assist with initial configuration via Joule
What Makes This Different:
- Visual Page Editor – See changes in real-time as you configure
- AI Suggestions – Joule recommends which fields to display based on your data model
- Annotation Generator – Automatically creates UI annotations from your selections
- One-Click Deploy – Push to SAP BTP and Work Zone instantly
Using Modern IDEs with SAP Build Code
For professional developers, SAP Build Code enables a powerful workflow:
- Open your preferred IDE (Cursor, VS Code, etc.)
- Install SAP extensions and connect to SAP Build
- Use AI agents to generate application scaffolding
- Describe what you want: “Create a List Report for Customer data with sales history”
- The AI generates CDS annotations, manifest configuration, and UI logic
- Review, refine, and deploy
Example AI Prompt for Cursor:
"Create Fiori List Report annotations for ZXC_CUSTOMER.
Include columns: CustomerID, Name, City, Country.
Add filters for City and Country.
Add data points in header for TotalOrders and TotalRevenue."
The AI generates complete annotations, understanding SAP-specific syntax and best practices.
Traditional Approach (For Reference)
If you’re using SAP Business Application Studio or maintaining existing applications:
- Create an SAP Fiori dev space
- Use Command Palette → Fiori: Open Application Generator
- Select List Report Page template
- Configure your service and entity sets
- Generate the application
Step 3: Configuring UI Annotations
Annotations control how your application looks and behaves. With SAP Build, you can add these visually or let AI generate them.
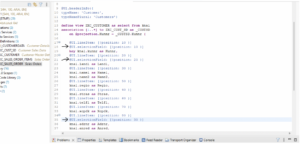
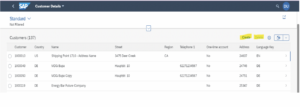
Table Header and Columns
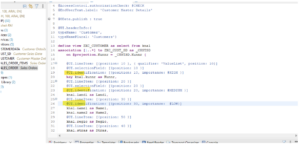
Define your table structure with these annotations:
@UI.headerInfo: {
  typeName: 'Customer',
  typeNamePlural: 'Customers',
  title: { value: 'CustomerName' }
}

@UI.lineItem: [
  { position: 10, importance: #HIGH, label: 'Customer ID' },
  { position: 20, importance: #HIGH, label: 'Name' },
  { position: 30, importance: #MEDIUM, label: 'City' }
]
SAP Build Alternative: Use the visual page editor to drag and drop fields onto the table. Build automatically generates these annotations behind the scenes.
Smart Filter Bar
Add intelligent filtering capabilities:
@UI.selectionField: [
  { position: 10 },
  { position: 20 },
  { position: 30 }
]
AI Enhancement: In 2025, the filter bar integrates with Joule, allowing users to filter data using natural language: “Show me customers in Germany with orders over €10,000.”
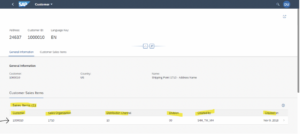
Step 4: Building the Object Page (Detail View)
The Object Page shows detailed information when users click a row.
Header Data Points
Display key metrics prominently:
@UI.dataPoint: {
  title: 'Total Orders',
  valueFormat: { numberOfFractionalDigits: 0 },
  visualization: #NUMBER
}
SAP Build Advantage: Drag KPIs into the header zone and Build configures data point annotations automatically, with proper formatting and visualization options.
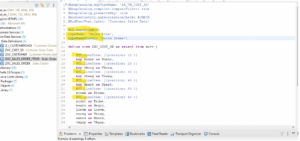
Identification Fields
Configure the General Information section:
@UI.identification: [
  { position: 10, label: 'Customer ID' },
  { position: 20, label: 'Name' },
  { position: 30, label: 'Email' }
]
Related Entity Tables
Show associated data like sales orders. Add line item annotations to your related CDS view:
@UI.lineItem: [
  { position: 10, label: 'Order Number' },
  { position: 20, label: 'Order Date' },
  { position: 30, label: 'Amount' }
]
The Object Page now displays comprehensive customer information with related sales data:
Step 5: Adding Intelligence and Actions
CRUD Operations with AI Validation
Enable create, update, and delete with intelligent validation:
@ObjectModel.semanticKey: ['CustomerID']
@ObjectModel.transactionalProcessingDelegated: true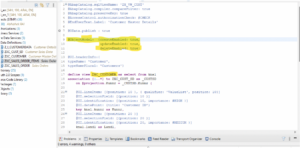
Your application now has Create, Edit, and Delete buttons:
2025 Enhancement: With SAP Build Process Automation, you can add AI-powered validation rules and approval workflows that execute when users create or modify records.
Custom AI Actions
Using SAP Build and Joule Studio, you can add custom AI actions directly to your List Report:
- “Analyze Customer Risk” – AI agent evaluates payment history and flags concerns
- “Suggest Upsell Opportunities” – Based on purchase patterns and industry trends
- “Generate Summary Report” – AI creates executive summary from customer data
These intelligent actions integrate seamlessly with your Fiori application, appearing as buttons that trigger AI workflows.
Step 6: Advanced Configuration
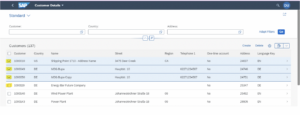
Multi-Select Mode
Enable bulk operations by editing manifest.json:
"listReport": {
  "options": {
    "multiSelect": true
  }
}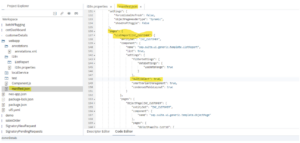
Users can now select multiple rows with checkboxes:
Deployment: The SAP Build Advantage
One-Click Deployment to SAP BTP
Traditional deployment involves multiple steps and configurations. SAP Build changes this completely:
- Click Deploy in SAP Build
- Select target: SAP BTP Cloud Foundry or ABAP environment
- Choose whether to add to Work Zone
- Deploy completes in minutes
Your application is instantly available in SAP Build Work Zone, accessible to users with proper authorizations.
Integration with Modern DevOps
SAP Build integrates with modern development practices:
- Git integration for version control
- CI/CD pipelines for automated testing
- Multi-environment deployment (dev, test, prod)
- Rollback capabilities for safe updates
The Future: AI Agents and SAP Development
Here’s where things get really exciting. SAP Build’s integration with modern IDEs and AI agents means you can:
Develop with AI Pair Programming
Use Cursor or VS Code with GitHub Copilot to write SAP-specific code:
- AI understands CAP (Cloud Application Programming Model)
- Generates CDS views, annotations, and service definitions
- Suggests OData query optimizations
- Creates test cases automatically
Build with Joule Studio
Create custom AI agents that integrate with your applications:
- Data analysis agents that surface insights from your List Reports
- Workflow agents that automate approval processes
- Integration agents that connect SAP with external systems
Natural Language Development
Describe what you want in plain language, and AI builds it:
“Add a section to the Object Page showing customer satisfaction scores with a trend chart. If satisfaction drops below 7, highlight it in red and suggest a follow-up task.”
The AI agent generates the annotations, creates the chart visualization, adds conditional formatting logic, and integrates with SAP Build Process Automation for task creation.
Why Mindset for Your SAP Build Journey
At Mindset, we’ve been at the forefront of SAP UX innovation for over a decade. Our expertise with SAP Build, AI-driven development, and human-centered design ensures your applications aren’t just technically sound—they’re intuitively designed for the people who use them.
We help organizations:
- Accelerate development with SAP Build and AI tools
- Integrate modern IDEs like Cursor into SAP development workflows
- Build custom AI agents with Joule Studio
- Design applications using our proven AppHaus methodology
- Deploy on SAP BTP with clean core architecture
Conclusion: Embrace the AI-Powered Future
Creating SAP Fiori List Report applications has evolved dramatically. What once required extensive coding and deep technical expertise can now be accomplished through:
- Visual development in SAP Build
- AI-assisted coding with modern IDEs
- Natural language commands via Joule
- Intelligent agents that understand business context
The traditional approach still works, but SAP Build represents the strategic future. Organizations adopting this platform now will build applications faster, with better UX, and with AI capabilities that continuously improve over time.
Next Steps
- Explore SAP Build capabilities
- Learn about SAP BTP for cloud deployment
- Try Cursor or VS Code with SAP extensions
- Experiment with Joule Studio for AI agent creation
- Deploy to SAP Build Work Zone for unified user experience
Ready to accelerate your SAP development with AI? Contact Mindset to discover how we can help you leverage SAP Build, modern AI tools, and human-centered design to transform your SAP applications.
Want more SAP innovation insights? Visit our blog for the latest tutorials and best practices.
Connect with us on LinkedIn for cutting-edge SAP updates.