
Build modern, transactional SAP Fiori applications using the RESTful Application Programming (RAP) managed framework. This comprehensive guide walks you through creating cloud-ready applications that align with SAP’s Clean Core principles.
About Mindset Consulting
At Mindset Consulting, we’re an SAP Gold Partner specializing in human-centered digital transformation. As a certified SAP AppHaus Partner operating the Minneapolis SAP AppHaus, we combine deep SAP expertise with Design Thinking methodologies to create solutions that truly serve your people.
Our approach centers on human-centric design and Clean Core principles—ensuring your SAP investments remain agile, upgradable, and future-ready. By leveraging SAP Business Technology Platform (BTP), we help enterprises extend SAP capabilities without compromising core system integrity.
What You’ll Build
This tutorial demonstrates building a transactional Fiori application using the RAP-managed framework on SAP BTP. You’ll learn to implement essential features including:
- Value help integration for selection fields
- Mandatory field validation
- Custom buttons with conditional visibility
- Date range inputs
- Dropdown selections
- Dynamic item counts in line item headings
- Icon attachments in line items
- Navigation between object pages
- Association handling between header and item data
Understanding Clean Core in RAP Development
Before diving into development, it’s important to understand how this approach aligns with SAP’s Clean Core strategy. Clean Core emphasizes keeping your SAP system’s core clean and standard while extending functionality through side-by-side extensions on SAP BTP.
The RAP framework supports Clean Core by:
- Decoupling extensions from the core system through projection views
- Using ABAP Cloud development model with released APIs
- Enabling upgrade safety through standardized development patterns
- Supporting side-by-side extensions via SAP BTP integration
💡 Clean Core Tip: Following RAP best practices ensures your custom applications remain compatible with future SAP updates, reducing technical debt and accelerating innovation cycles.
Prerequisites & Setup
To follow this guide, you’ll need:
- Access to SAP BTP with ABAP environment or SAP S/4HANA Cloud
- Eclipse IDE or SAP Business Application Studio
- ABAP Development Tools (ADT) installed
- Basic understanding of ABAP and CDS views
- Familiarity with OData services
Development Components Overview
Building a complete RAP-based Fiori application requires creating these components in sequence:
- Package – Container for all development objects
- Data Elements & Domains – Data type definitions
- Database Tables – Persistent data storage
- CDS Views – Three layers: Basic, Composite, and Consumption views
- Metadata Extensions – UI annotations and field properties
- Behavior Definitions – Business logic and validations
- Behavior Implementation – ABAP classes implementing business logic
- Service Definition – Exposing entities as OData services
- Service Binding – Publishing the OData service
Step 1: Create the ABAP Package
Begin by creating a package to organize all development objects:
- Open Eclipse or SAP Business Application Studio
- Connect to your cloud project
- Right-click on the project and select New → ABAP Package
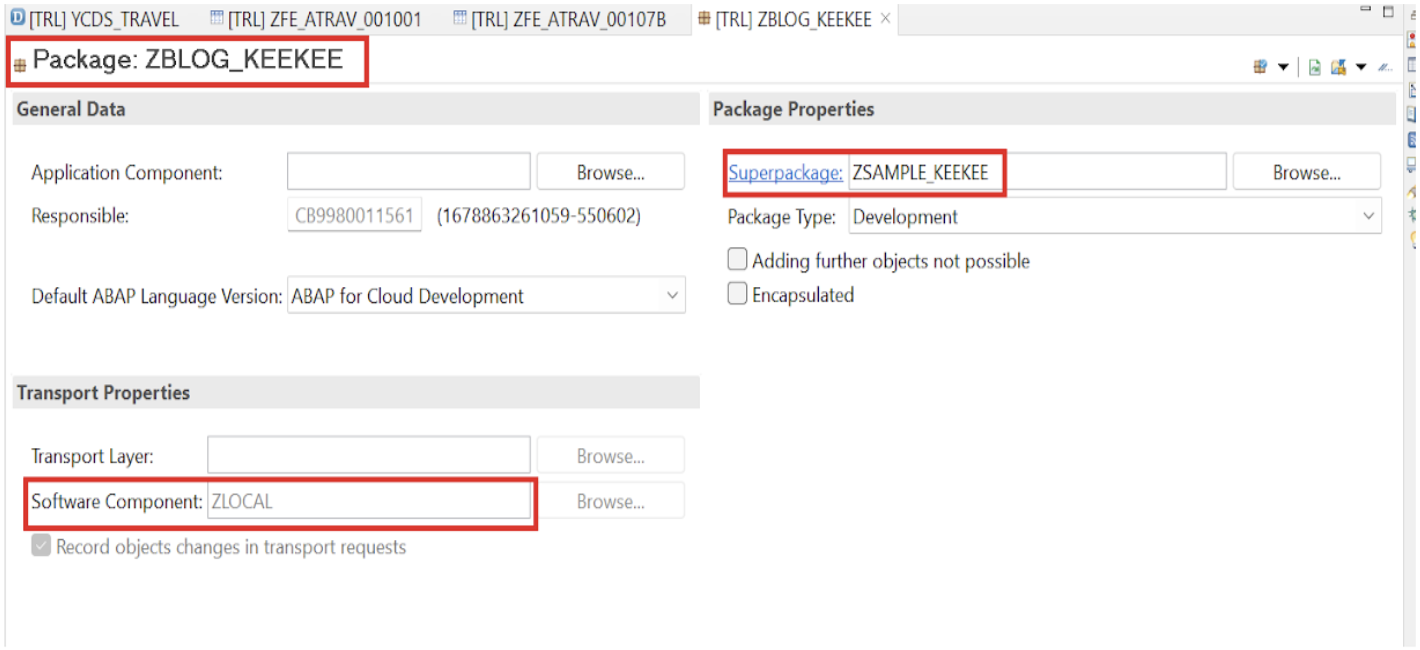
- Enter package name (e.g.,
ZBLOG_KEEKEE) - Add a meaningful description
- Complete the package creation
Step 2: Create the Root View Entity
The root view entity is the foundation of your RAP application. It defines the primary data structure and relationships.
Data Sources
For this tutorial, we’ll use the following data sources:
- ZFE_ATRAV_001001 – Travel data table (header)
- /DMO/I_AGENCY – Standard agency view for reference data
- YCDS_OVERALL_TEXT_7B – Custom view for status text conversion
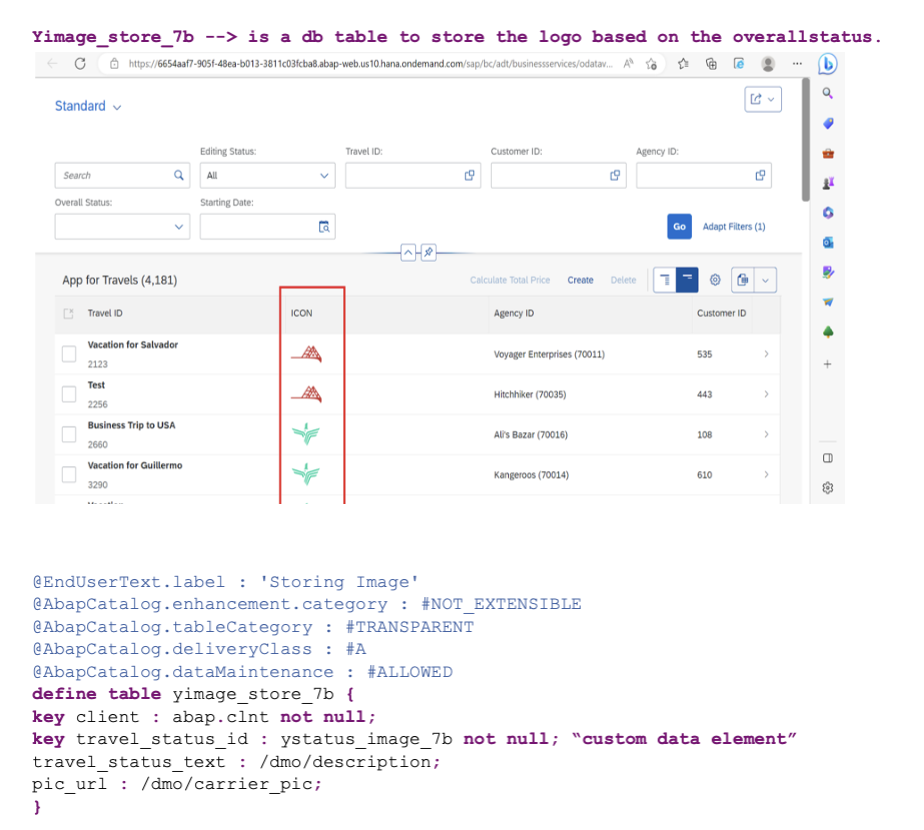
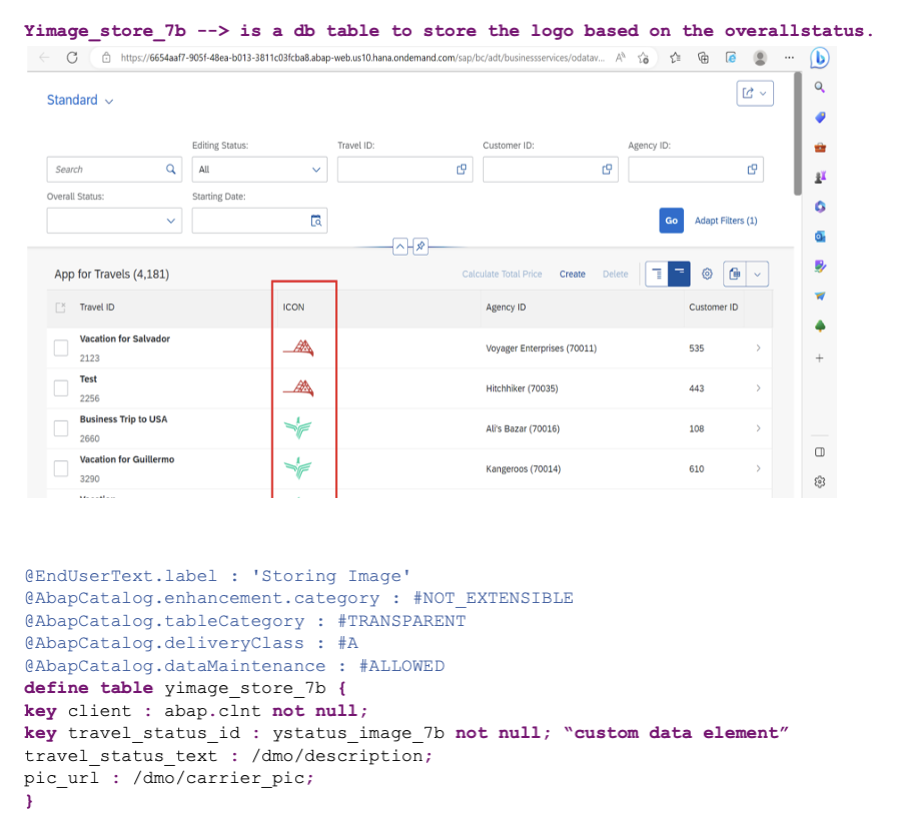
- YCDS_IMAGE_STORE_7B – Custom view for logo/image management
- YCDS_BOOKING_7B – Custom view for booking line items

Important Notes:
- In cloud environments, use existing tables or create data via ABAP classes
- Direct data insertion into custom tables requires programmatic approach
- Leverage standard SAP tables and views when available for consistency
Step 3: Create Supporting CDS Views
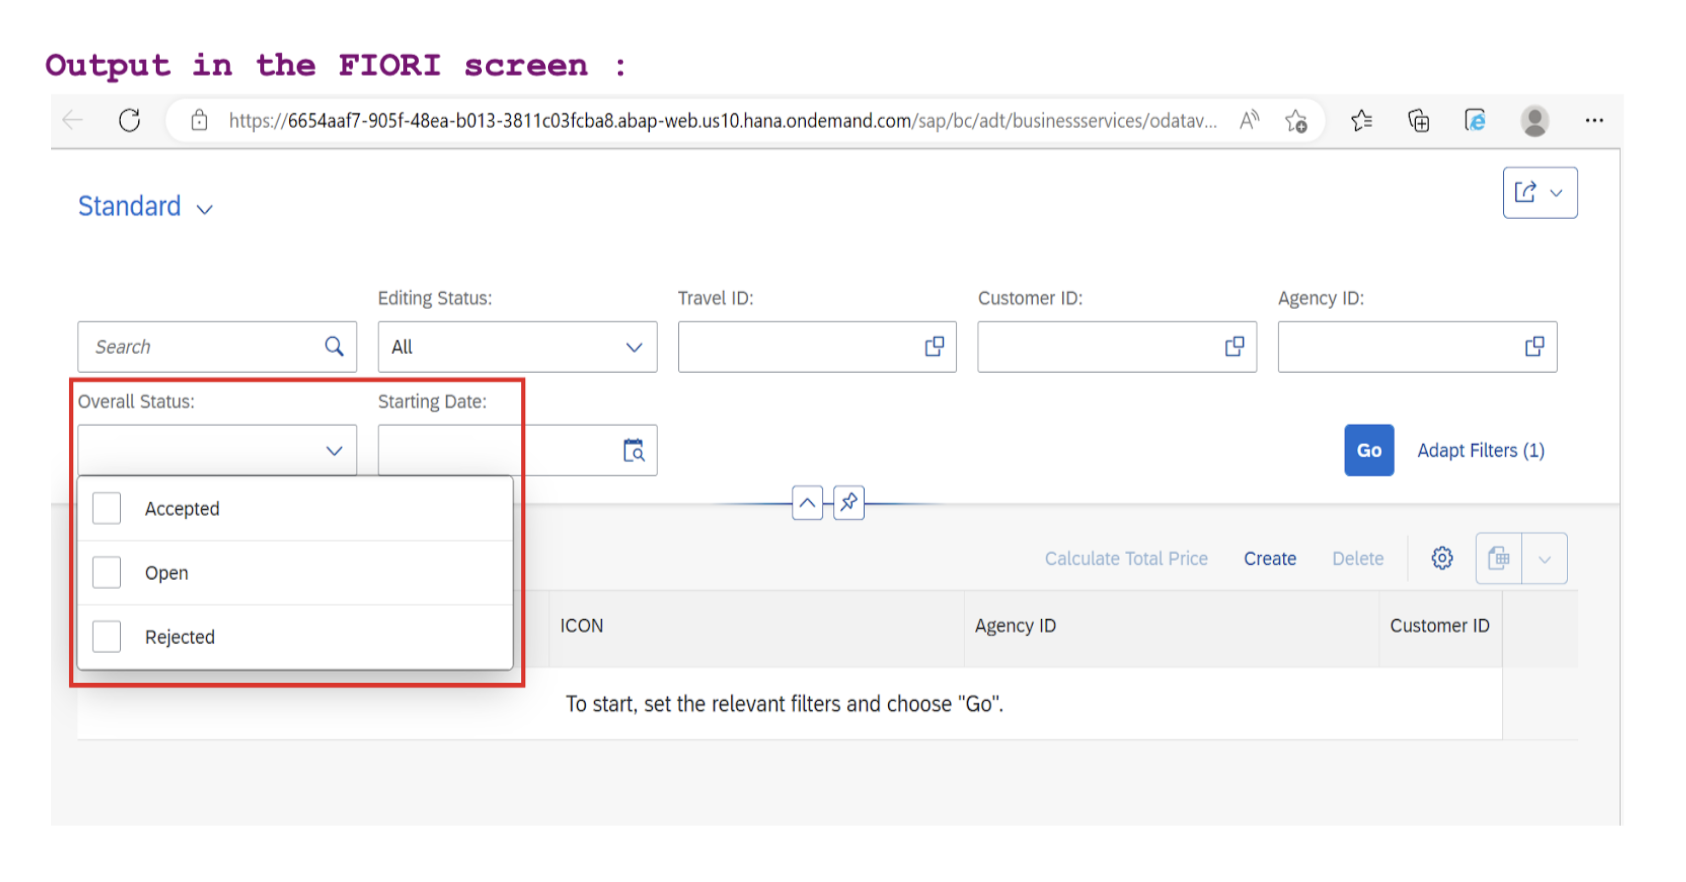
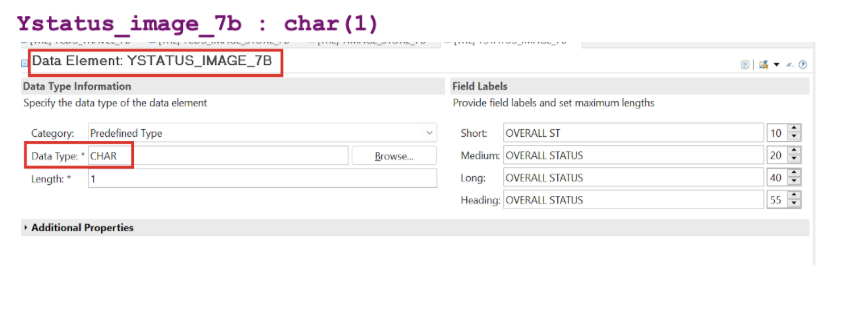
3.1 Status Text View (YCDS_OVERALL_TEXT_7B)
This view converts status codes into readable text for the UI:
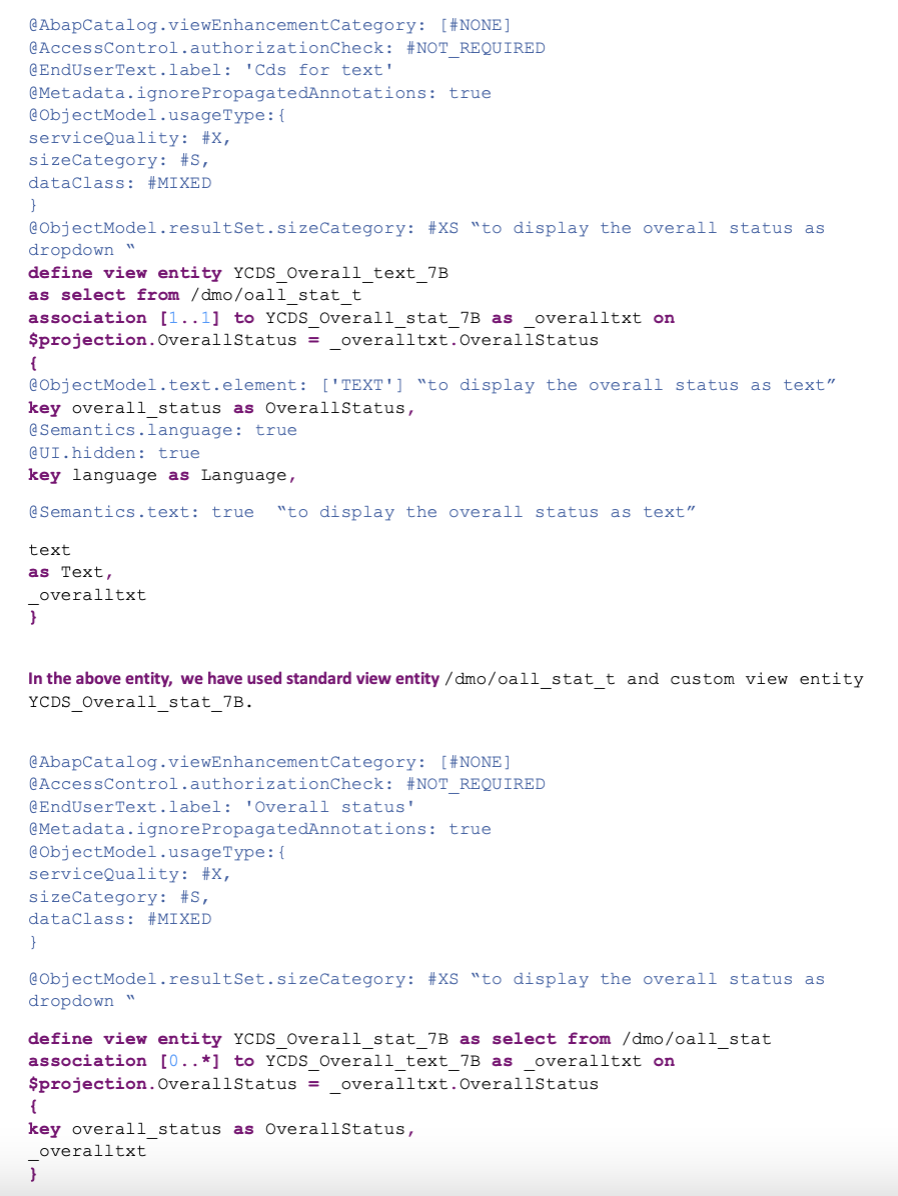
⚠️ Activation Requirement: Create both YCDS_OVERALL_STAT_7B and YCDS_OVERALL_TEXT_7B together and activate them simultaneously using the mass activation feature in Eclipse, as they have mutual dependencies.
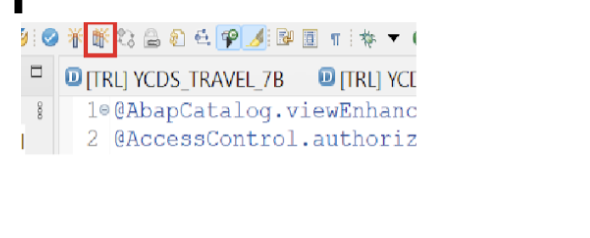
3.2 Image Store View (YCDS_IMAGE_STORE_7B)
This view manages logos and images displayed in the application:
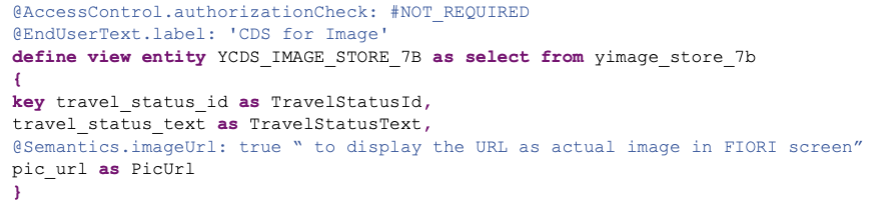
The image table is populated using the class YCL_IMAGE_STORING_DATA_7B, which is included in the complete code provided at the end of this guide.
3.3 Booking View (YCDS_BOOKING_7B)
This view handles the line item data associated with each travel record:
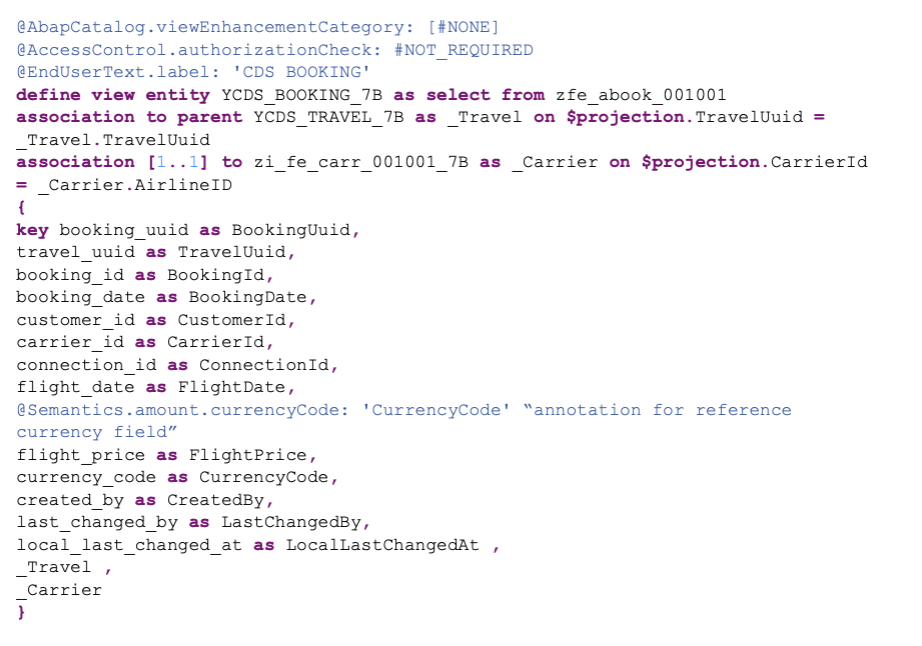
The booking view uses the ZFE_ABOOK_001001 table, which contains booking details including customer information, flight details, and pricing data.
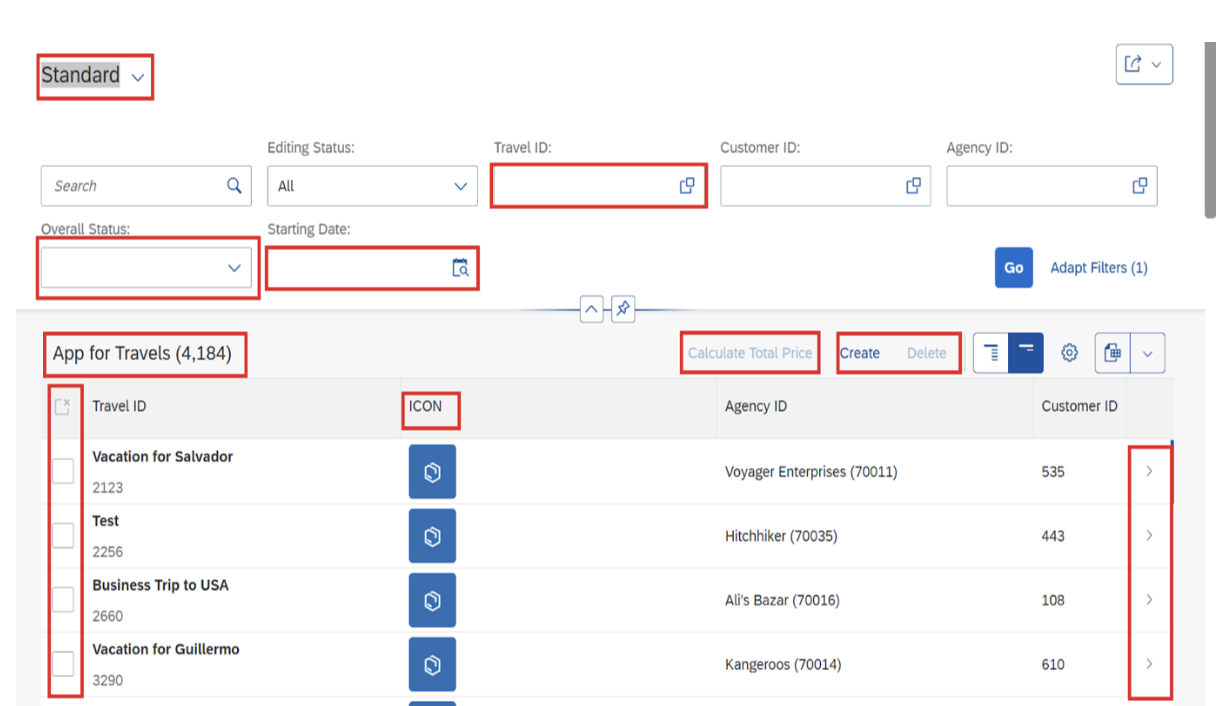
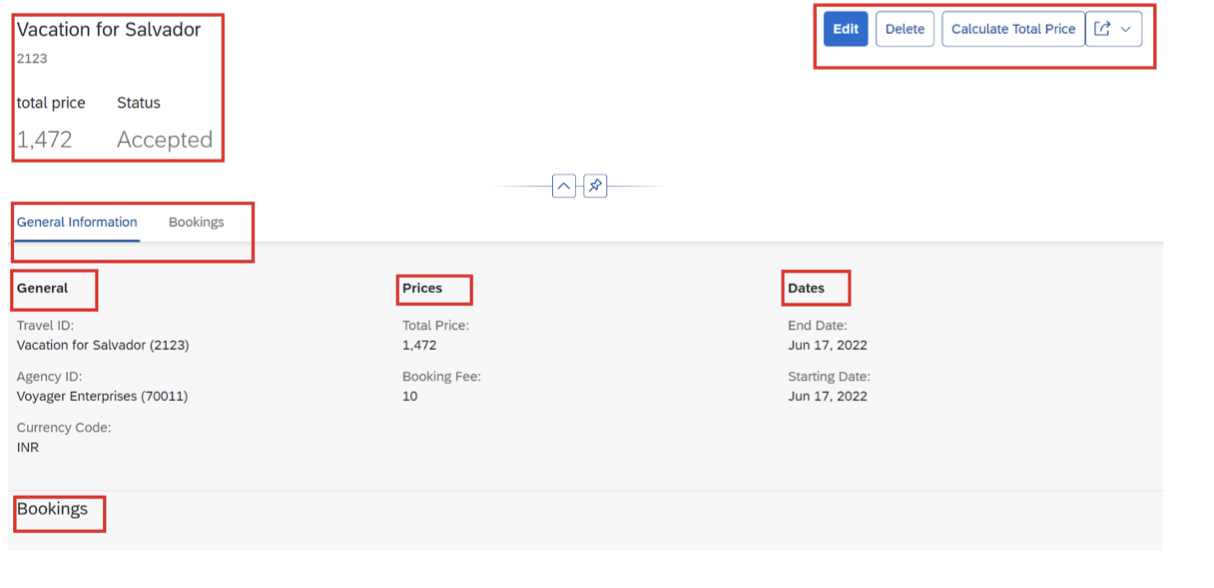
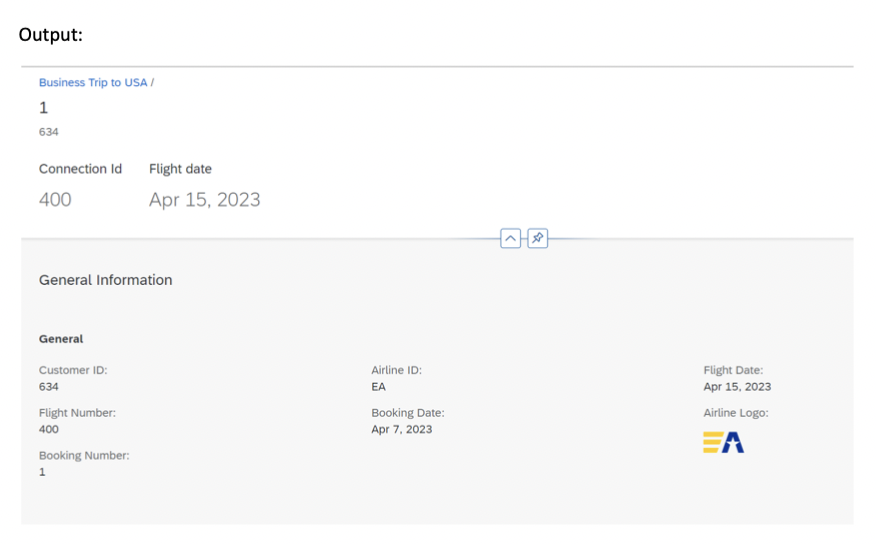
Step 4: Configure Object Page Navigation
Object pages provide detailed views for individual records. This application demonstrates multi-level navigation from list to header details to booking items.
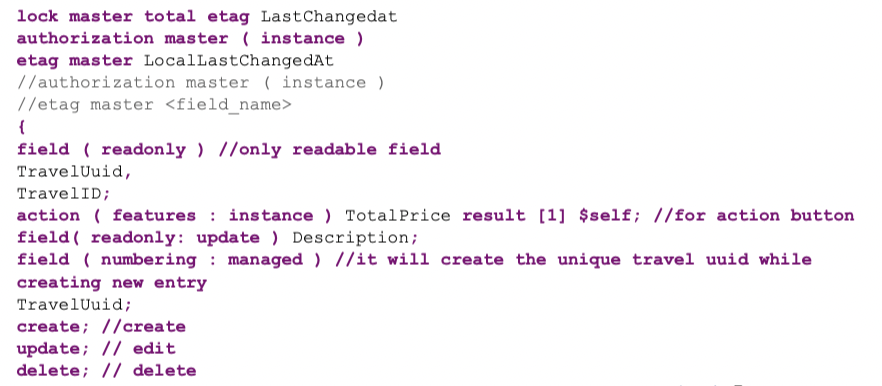
Step 6: Implement Behavior Definitions
Behavior definitions specify the business logic, validations, and actions available for your entities. This is where you define CRUD operations, validations, determinations, and custom actions.
Key Behavior Components
- Standard Operations – Create, Read, Update, Delete (CRUD)
- Validations – Field-level and cross-field validations
- Determinations – Automatic field calculations
- Actions – Custom business operations (e.g., approve, reject)
- Associations – Relationships between entities
Step 7: Create Service Definition and Binding
The final steps involve exposing your entities as OData services that Fiori applications can consume.
Service Definition
Define which entities and associations to expose in the OData service. This controls what data is accessible to the UI layer.
Service Binding
Publish the service definition as an OData V2 or V4 service. The service binding generates the runtime artifacts needed for Fiori consumption.
- Create service definition including all projection views
- Create service binding (OData V2 UI or OData V4 UI recommended)
- Activate and publish the service
- Preview the Fiori application using the built-in preview feature
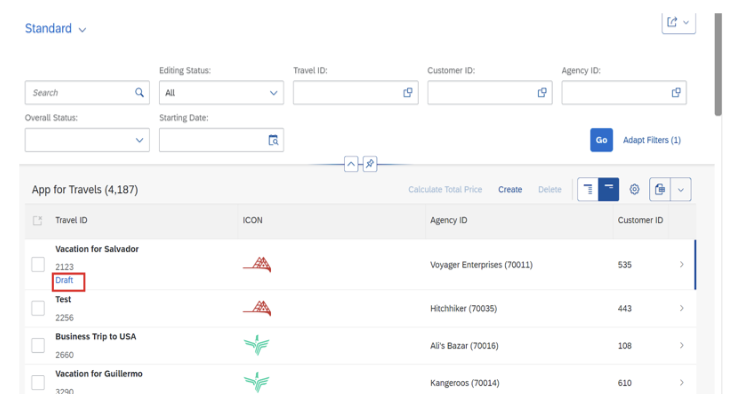
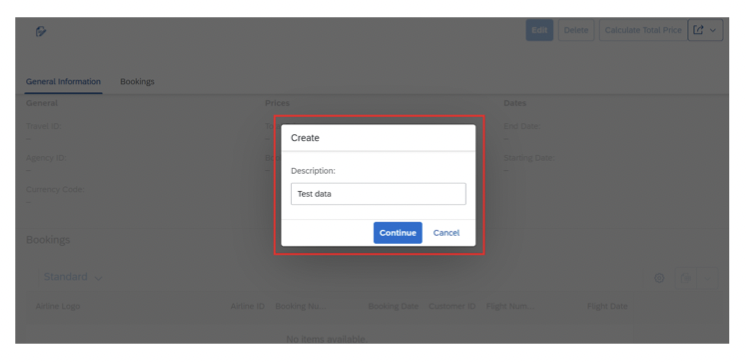
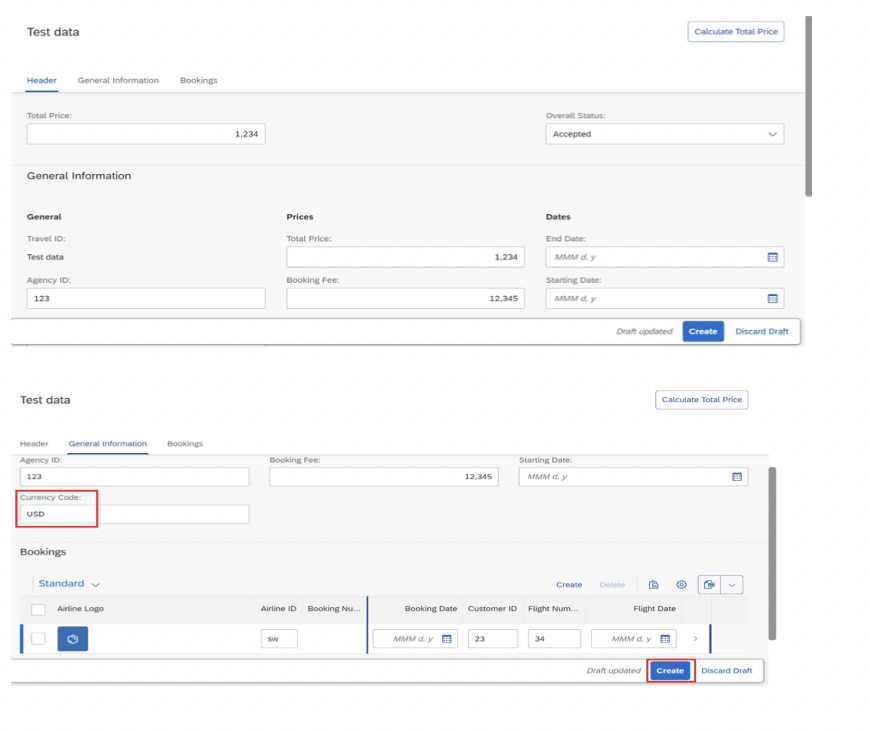
Step 8: Understanding Draft Handling
RAP provides built-in draft handling, allowing users to save work in progress without committing to the database. This is particularly important for complex forms or multi-step processes.
Draft Features
- Auto-save – Periodic automatic saving of user changes
- Resumable editing – Users can return to incomplete work
- Draft table – Temporary storage separate from active data
- Discard capability – Users can abandon changes
Draft data persists until explicitly saved or discarded, enabling users to work across multiple sessions without losing progress.
Step 9: Advanced UI Configurations
9.1 Status Highlighting
Use criticality annotations to highlight status fields with appropriate colors:
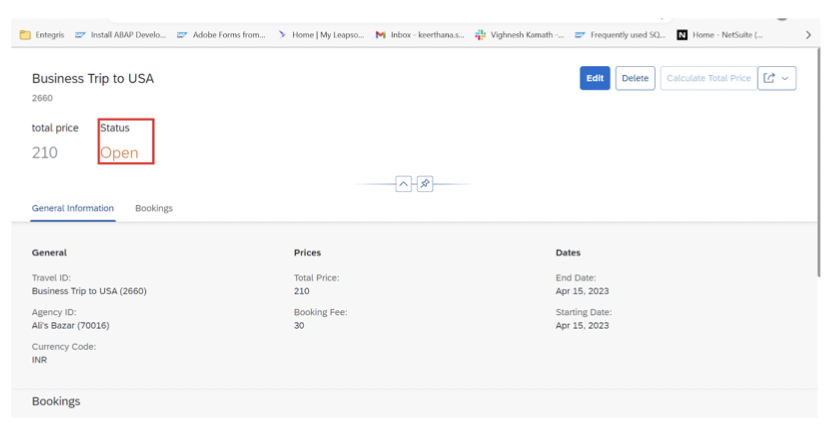
Add criticality annotations in your metadata extension to achieve semantic coloring based on status values.
9.2 Custom Button Visibility
Implement conditional button visibility using feature control in your behavior definition. Buttons can be shown or hidden based on field values or user authorizations.
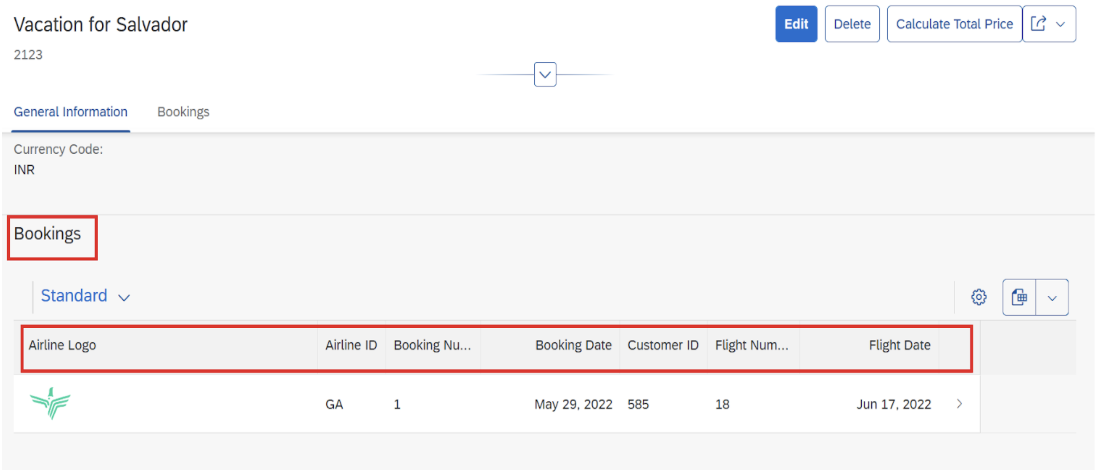
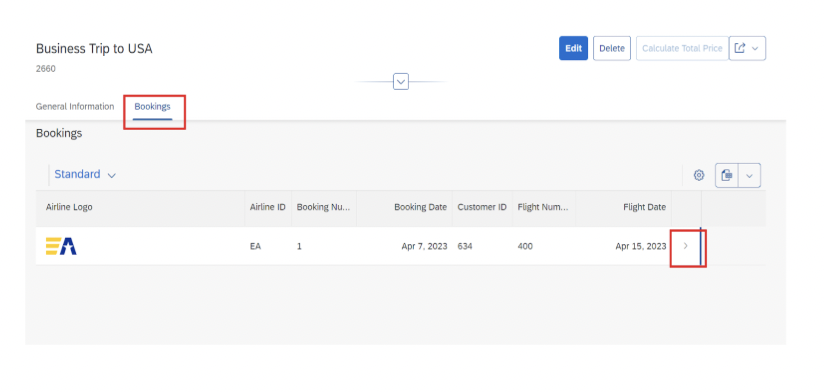
9.3 Navigation to Second-Level Object Pages
Configure navigation from the bookings tab to detailed booking views:
Step 10: Testing Your Application
Thorough testing ensures your RAP application functions correctly and provides a good user experience.
Testing Checklist
- ✓ CRUD Operations – Verify create, read, update, and delete functionality
- ✓ Validations – Test all field validations and error messages
- ✓ Value Helps – Ensure dropdown and search helps work correctly
- ✓ Navigation – Test navigation between list and object pages
- ✓ Custom Actions – Verify custom button functionality
- ✓ Draft Handling – Test save draft and discard draft scenarios
- ✓ Associations – Validate parent-child relationships
- ✓ UI Responsiveness – Test on different screen sizes
Best Practices & Clean Core Alignment
Development Best Practices
- Use Released APIs Only – Stick to ABAP Cloud-compatible APIs for upgrade safety
- Separate Concerns – Keep business logic in behavior implementations, UI in metadata extensions
- Leverage Standard Views – Reuse SAP-provided CDS views when possible
- Document Annotations – Comment your metadata extensions for maintainability
- Version Control – Use gCTS or Git integration for source code management
- Test Thoroughly – Implement comprehensive unit and integration tests
Clean Core Compliance
Ensure your RAP development aligns with Clean Core principles:
- ✓ Minimal core modifications – Use projection and extension views instead
- ✓ Side-by-side extensions on BTP when needed for complex scenarios
- ✓ Released APIs only – Avoid using internal or undocumented APIs
- ✓ Upgrade-safe code – Follow SAP development guidelines strictly
- ✓ Proper separation of layers – Business logic, data, and UI properly separated
✅ Clean Core Success: By following RAP best practices and using released APIs, your application will be compatible with future SAP updates, ensuring long-term maintainability and reducing total cost of ownership.
Performance Optimization Tips
- Efficient CDS Views – Use appropriate joins and avoid Cartesian products
- Virtual Elements Sparingly – Calculate derived fields only when necessary
- Proper Indexing – Ensure database tables have appropriate indexes
- Lazy Loading – Use on-demand loading for associations when applicable
- Batch Processing – Handle bulk operations efficiently in behavior implementations
- Caching Strategy – Cache frequently accessed reference data appropriately
Common Issues & Solutions
Activation Errors
Problem: Cannot activate dependent views together
Solution: Use mass activation (Ctrl+Shift+F3) to activate all dependent objects simultaneously
Service Binding Issues
Problem: Service preview shows no data
Solution: Verify behavior definition is properly implemented and data exists in source tables
Draft Handling Problems
Problem: Changes not persisting to active data
Solution: Check behavior implementation for proper save sequence and ensure COMMIT WORK is called
Value Help Not Appearing
Problem: Dropdown/search help not showing
Solution: Verify @Consumption.valueHelpDefinition annotation is correctly configured in metadata extension
Additional Resources & Learning
Mindset Consulting Resources
SAP Official Documentation
Design Thinking & Human-Centered Design
At Mindset, we believe technology should serve people. Our AppHaus methodology combines Design Thinking with technical expertise to create solutions users love. Learn more about our human-centered approach:
Conclusion
Building RAP-based Fiori applications on SAP BTP represents the future of SAP development. By following Clean Core principles and leveraging the RAP framework, you create applications that are:
- ✓ Upgrade-safe – Compatible with future SAP releases
- ✓ Maintainable – Clear separation of concerns and proper architecture
- ✓ Scalable – Built on cloud-native principles
- ✓ User-friendly – Following Fiori design guidelines
- ✓ Future-ready – Aligned with SAP’s strategic direction
Whether you’re just starting your SAP BTP journey or looking to modernize existing applications, the RAP framework provides a robust foundation for building enterprise-grade solutions.
Need Help with Your SAP Transformation?
Mindset Consulting specializes in human-centered SAP solutions. Our team of certified experts can help you:
- Design and implement RAP-based Fiori applications
- Develop Clean Core strategies for your organization
- Leverage SAP BTP for innovation and extensibility
- Conduct Design Thinking workshops to identify opportunities
Contact Mindset Consulting to discuss how we can help transform your SAP landscape.


