Checkout an updated version here: Configuring the Launchpad in the Cloud!
We also do Fiori consulting of course. We’ve built hundreds of apps — checkout our stories here.
The Fiori Launchpad is great. If you’re not using it yet, you should be.
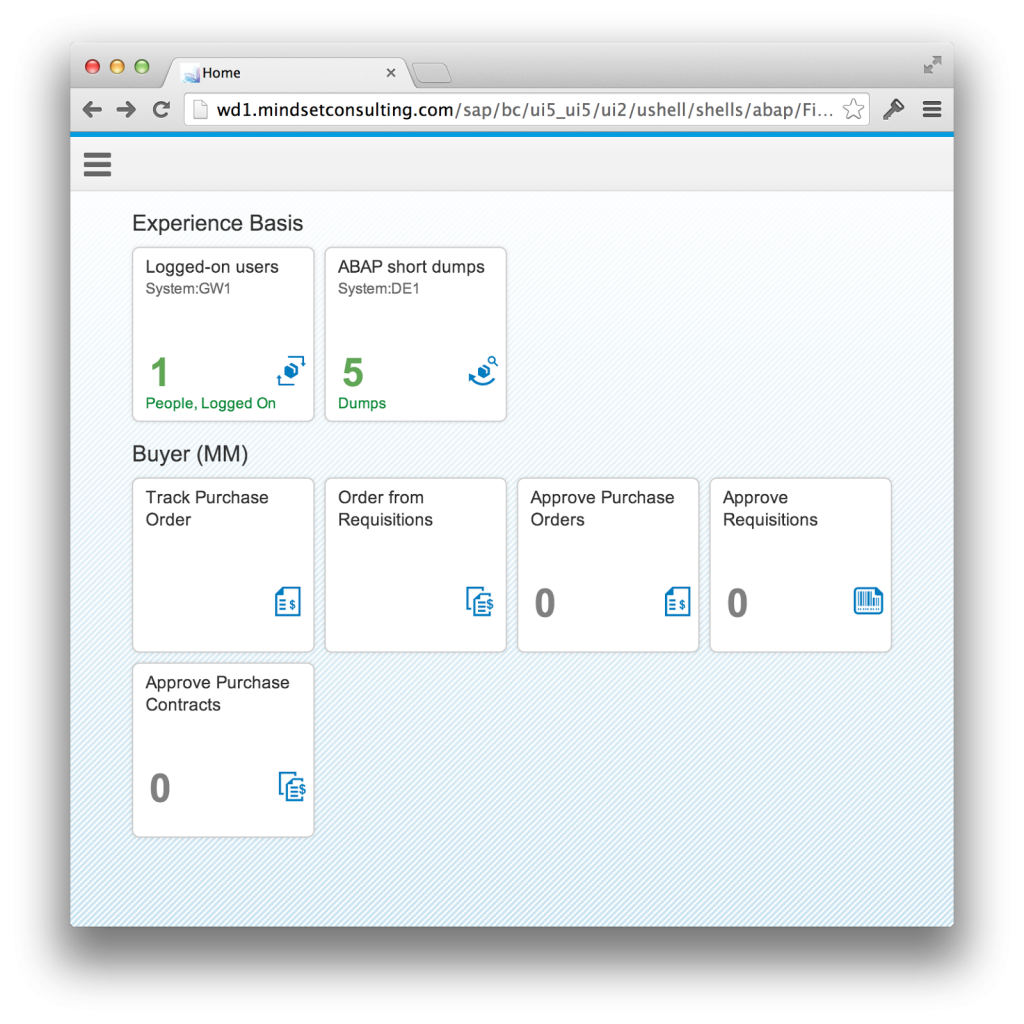 |
| SAP Fiori Launchpad |
The Waves of Fiori
A quick review of the versions may be useful. The first version of Fiori with the 25 apps is now referred to as SAP Fiori 1.0 (Based on SAP Fiori Launch Page). Those are delivered as all individual apps, and use the Launch Page, not the Launchpad. SAP Fiori 1.0 is also the only version generally available, however the ramp-up program is easy to get into for the next and probably most useful version. Next up are the 66 apps in SAP Fiori Principal and Transactional Apps for ERP, SRM, and CRM 1.0 (prior to Business Suite Innovations 2013) (link gives the overview in PDF).
Finally there will come the few hundred Apps with Business Suite Innovations 2013. These however, will require the latest ECC 6 EHP 7, which I think may take a while before everyone gets on board. We will focus our attention to the 2nd option, Prior to Business Suite Innovations 2013.
What’s Required
Let’s just assume a simple use case, Track Purchase Order and work from there. There are several components you will need to install, referenced here. It will look like this once you launch the App:
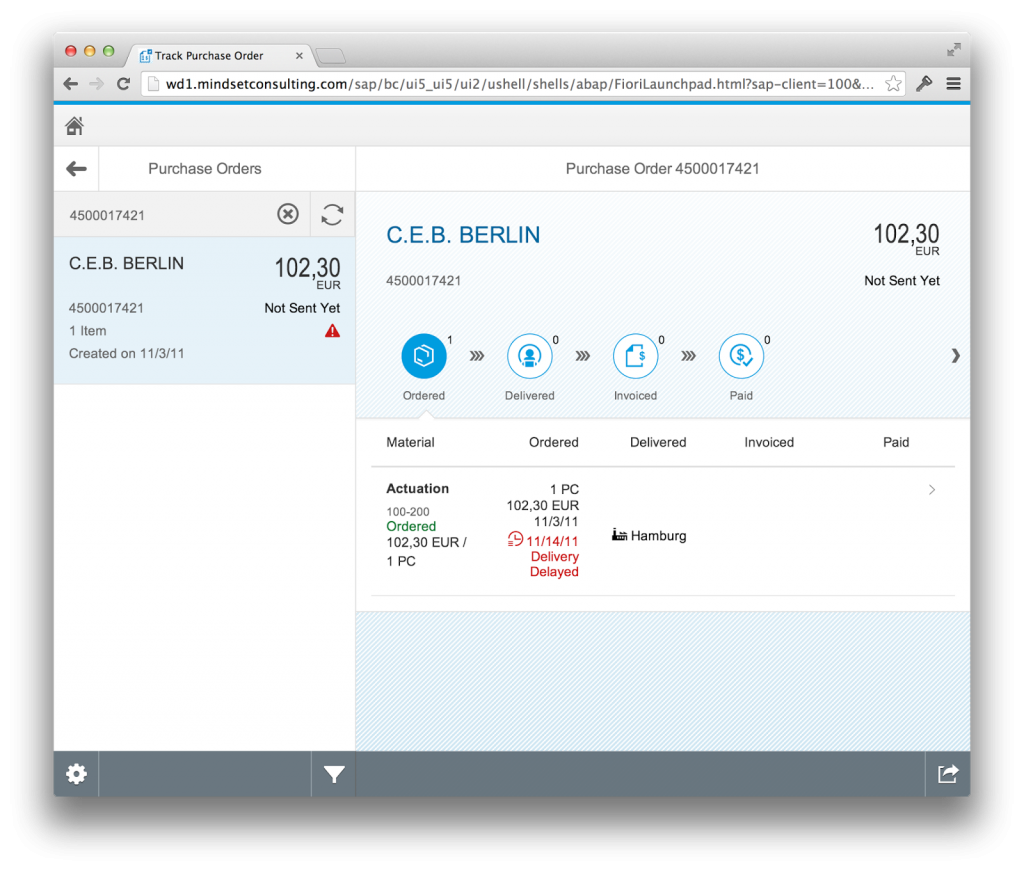 |
| SAP Fiori – Track Purchase Order |
Systems
- SAP Netweaver Gateway 7.4 SPS04 for HUB deployment (this is the most likely deployment option). This will come with most components like the UI Add-Ons out of the box. But you will need to add:
- Fiori ERP Applications X1 1.0:
- Central App UI NW740 – UIX01EAP
- HCM UI NW740 – UIX01HCM (optional)
- Travel UI NW740 – UIX01TRV (optional)
- Approve Requests UI NW740 – UIX01CA1 (optional)
- Fiori ERP Applications X1 1.0:
- SAP ERP 6, with any enhancement package but with the latest support package.
- Fiori ERP Applications X1 1.0, which is referred to as Central App INT. If you have ECC 6 ehp7, then you can use Central App INT 740. Personally, I would install everything here:
- GBAPP002 600
- Gateway BEP – Backend components of Gateway required to expose services.
- SRA001 – SRA021 – The actual services you can explore with SEGW on ECC.
- Fiori ERP Applications X1 1.0, which is referred to as Central App INT. If you have ECC 6 ehp7, then you can use Central App INT 740. Personally, I would install everything here:
Installation / Configuration Tips
- Apply for the Fiori Ramp-Up. Otherwise you will be installing the out of date Fiori 1.0 (not shown in this guide).
- Follow the guide here.
- Apply all of the SAP Notes as suggested! There are several errors that this resolves. There are a lot of notes, so this will take time.
- Upgrade all of the components described above in systems to the latest support package.
- Most software components are difficult to navigate to in the software catalog. You should do a search for “SAP Fiori ERP” which will locate the missing components.
- Once everything is installed, follow the configuration guide here. This includes your Gateway SPRO configuration and connectivity and SSO between Gateway and ERP.
Configuring the Launchpad
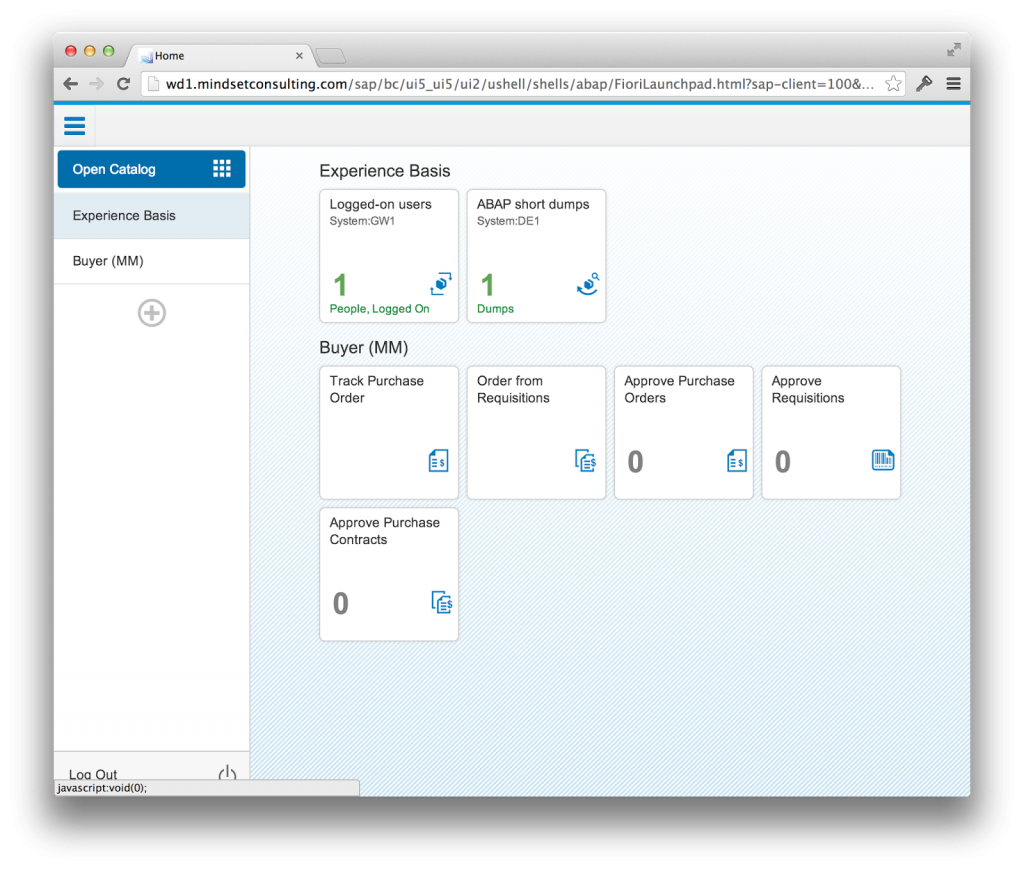 |
| SAP Fiori Launchpad with Catalog Open |
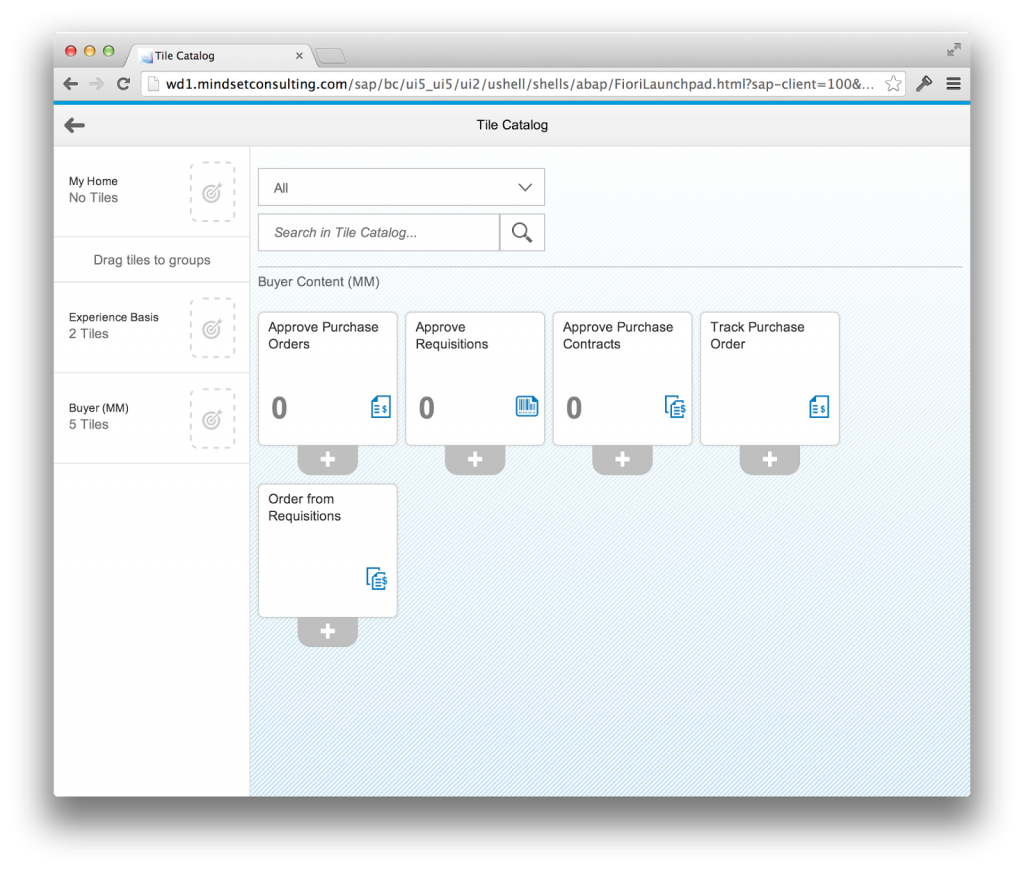 |
| SAP Fiori Launchpad Catalog Search |
Description of Components in Fiori Launchpad
- Tile – The actual box you see above that when clicked will launch an App.
- Catalog – All tiles must first be added to a Catalog. These are then searchable and can be added to Groups. Personally, I think this is a little redundant with Group.
- Group – Looking at the end-user screen shot, the groups are what separate the apps: Experience Basis, and Buyer (MM). These can also be assigned to roles and a user will automatically see them when they login.
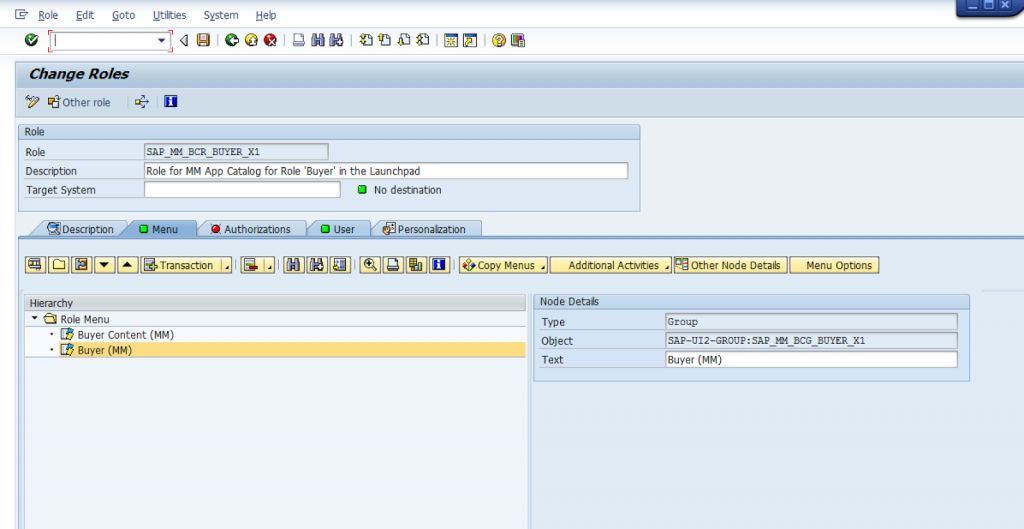 |
| SAP Fiori – Role for Track Purchase Order (MM Buyer) |
Administering the Launchpad
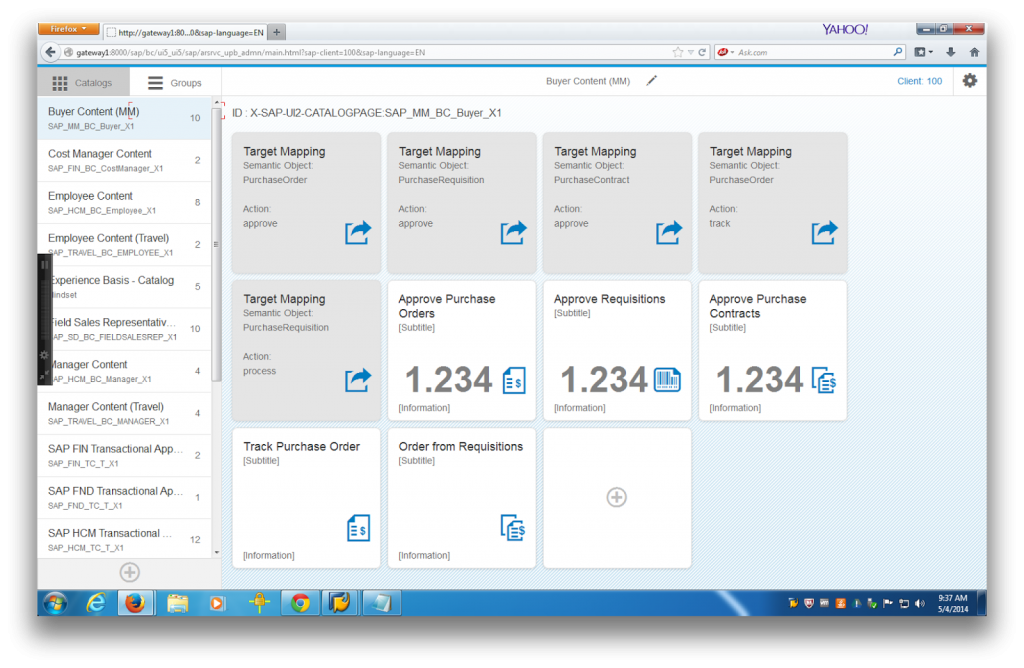 |
| SAP Fiori Launchpad Administration |
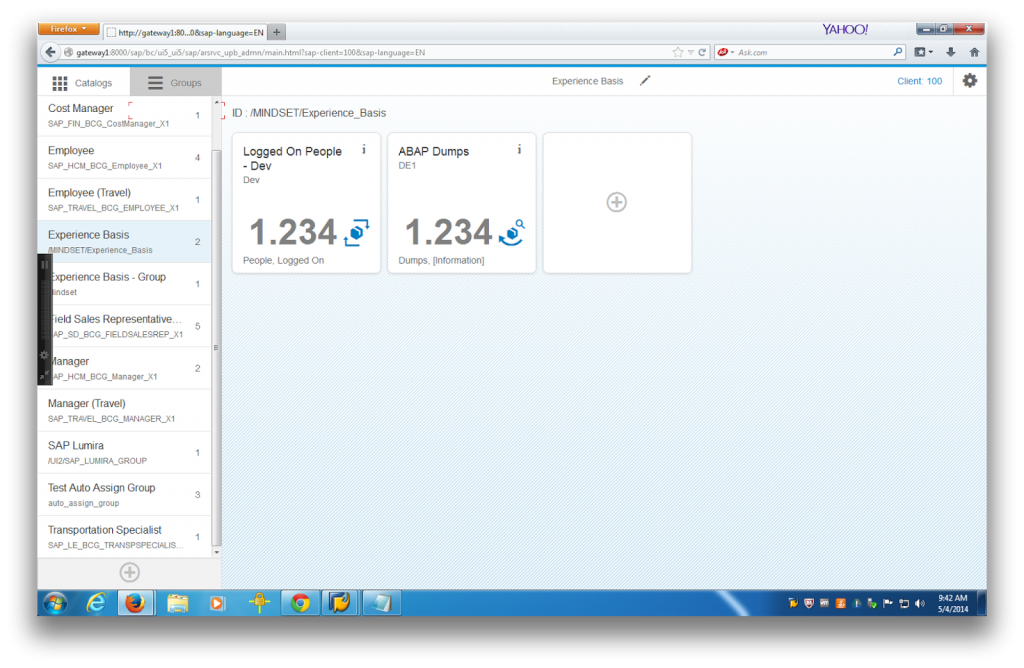 |
| SAP Fiori Launchpad – Managing Tiles in Groups |
A Few Other Notes
- Firstly, add dynamic tiles – Tiles that refresh every 15 seconds with a key figure such as pending approvals, sales orders, or system information.
- Secondly, add non-Fiori tiles – You can launch Web Dynpro, or any other URL to make a single navigation point for all of your backend applications, similar to what your Portal does today.
- Finally, add RSS feeds – You could add your company news for easy viewing on mobile devices or for updates like system outages or SAP notifications, such as “System will be down tomorrow so that we can install more Fiori Apps!“
Follow Ups
Feel free to follow up with me on SCN for any questions, demonstrations, implementation assistance, or customization requests. You can read more about Mindset, an SAP Partner, at https://mindsetstg.wpengine.com where we specialize in implementation and customization of alternative SAP User Interfaces. You can also connect with me on LinkedIn.
If you are interested in viewing similar articles, visit our blog, here.
View our LinkedIn, here.