In the first part of this blog, I explained how to create a simple SAPUI5 app on the SAP HANA Cloud: How To Create an SAP Mobile App on HANA Cloud with SAPUI5 – Part 1/3
In the 2nd part, I will continue with:
Creating content on HANA with ODATA and displaying it with SAPUI5 – Part 2/3
In this blog I will go over the following:
- Identify and move data from ECC into HANA
- Create an attribute view
- Create an ODATA service on the XSEngine
- Connect the ODATA service into SAPUI5
When we’re done, it will look like this:
 |
| SAPUI5 on HANA Cloud |
Identify and Move Data From ECC Into HANA
As part of our blog series, we are sampling some sales data by customer. The key tables we will move over are: VBRK (SD Sales Header) and KNA1 (Customer Master General). From VBRK the key fields are NETWR (Net Value of Invoice) and KUNAG (Sold To Party or Customer). From KNA1 we join KUNNR (Customer Number) to KUNAG. We also grab NAME1 from KNA1 so that we can see the descriptive name.
There are several methods to get data into HANA:
- SLT
- Data Services
- Manual Import / Export through CSV
- Direct Extract Connector
Personally I prefer SLT because it is:
- Real-time
- Easy to configure, simple to export and synchronize
- It performs really nicely under load (ensuring you have enough processes available).
Data services is much more powerful for data conversion, enrichment, and bulk data loads. It however, is not real time (though it can get close).
In this blog series I simply did imports and exports of these tables for simplicity. Thanks Karsten for this nice little tool! https://scn.sap.com/docs/DOC-39693
On the HANA system in the cloud you would do the following once your export is complete:
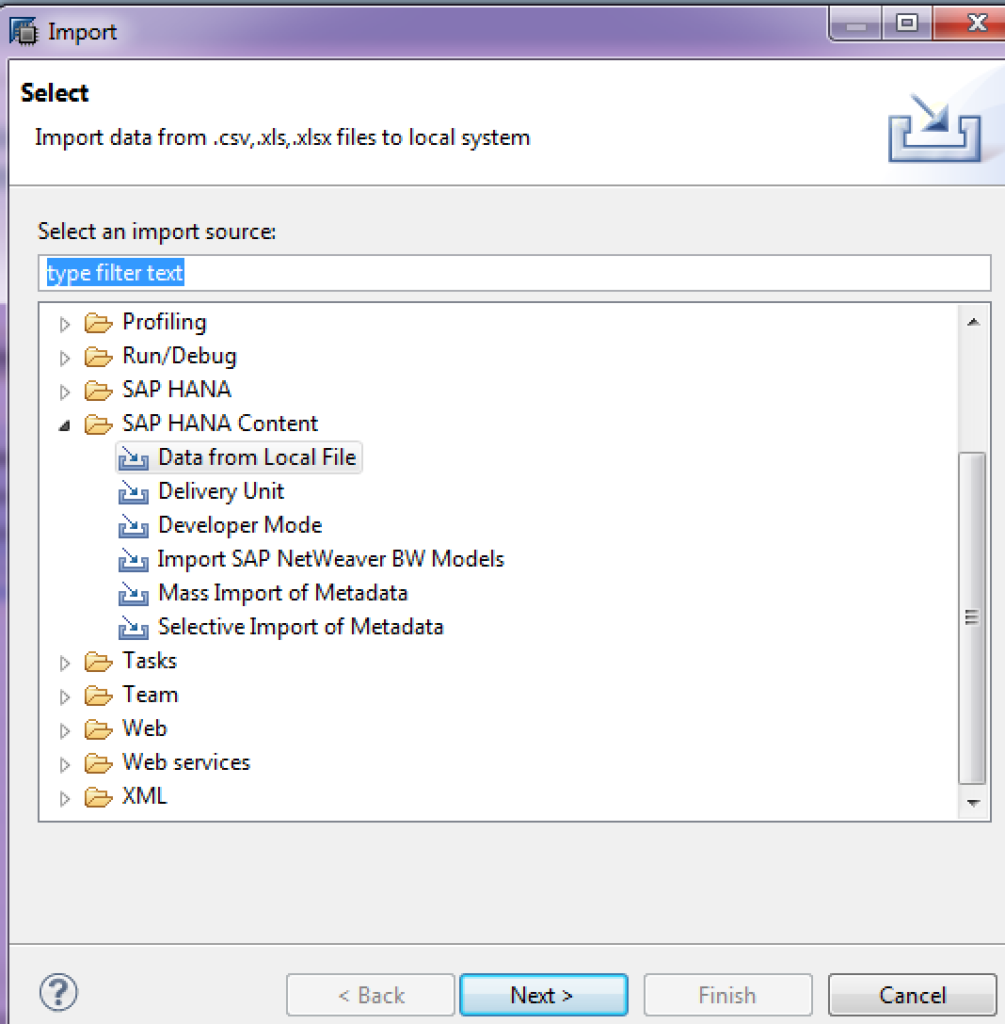
- Open HANA Studio (steps were in the previous blog).
- In the SAP HANA Modeler View, select from the top menu, file->Import… select Data from Local file and follow the prompts.
-
Select the delimiter as appropriate and adjust the data types. This can be a bit tedious, so maybe break for Starbucks now.
-
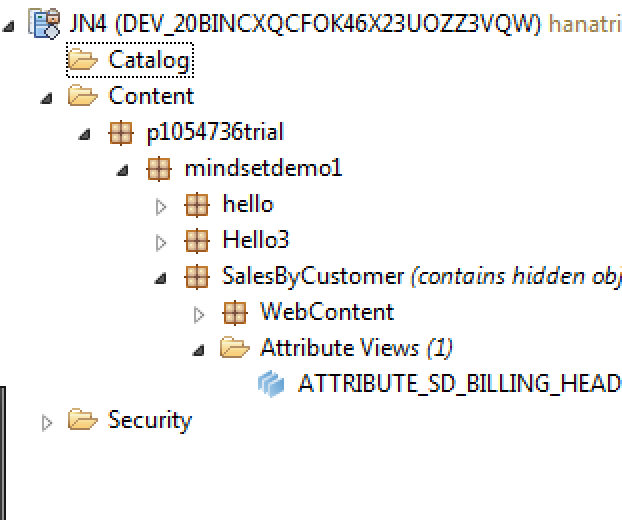
Once completed, you should have the two tables available on the HANA Cloud in your Catalog.
Create an Attribute View
We will join the two tables in this view, rename the fields, and provide some filters for easier adoption by the XSEngine and ODATA consumers.
- In the HANA Modeling View, navigate in the Content folder to the namespace that we declared in the last blog. Create a new attribute view ATTRIBUTE_SD_BILLING_HEADER.
-
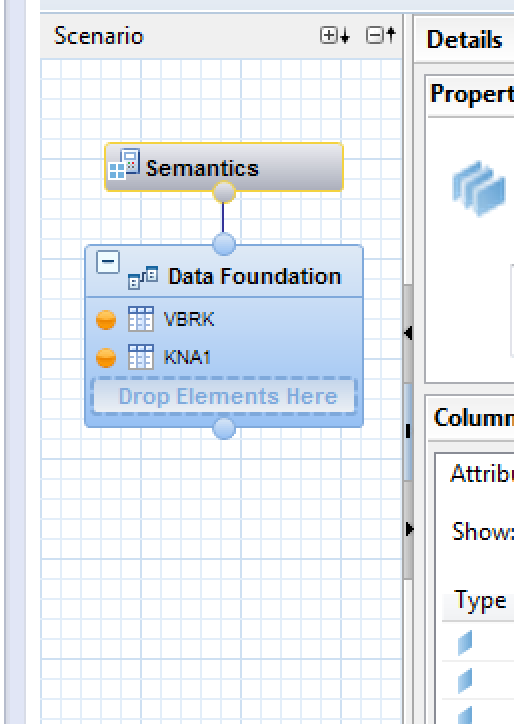
Open and edit this attribute view. Add in the two tables, KNA1 and VBRK to the data foundation.
-
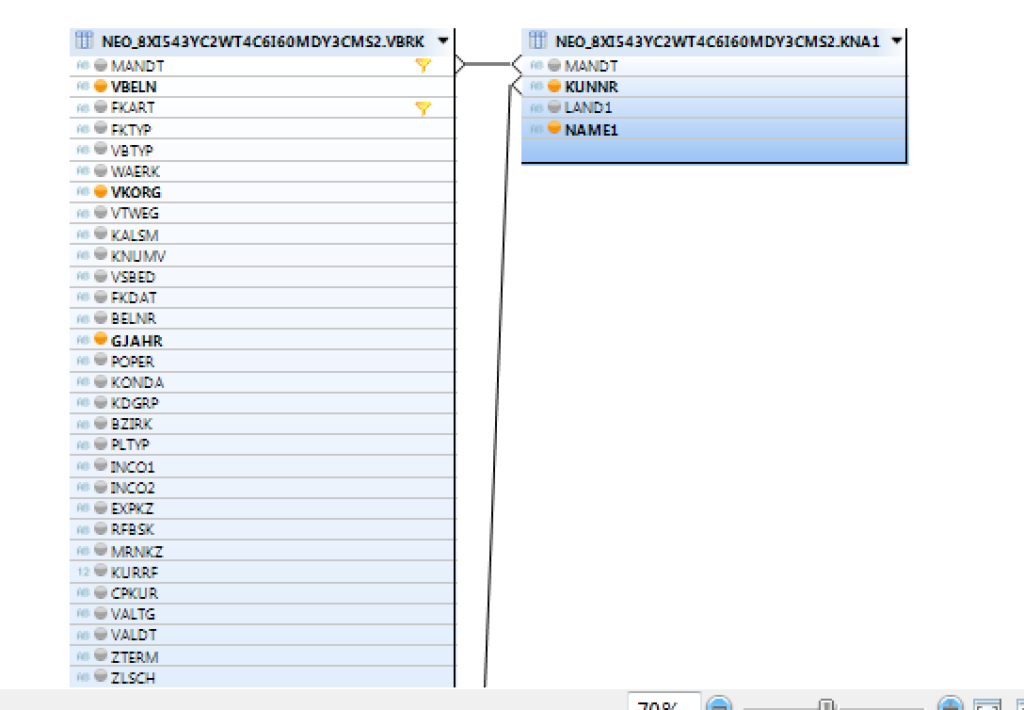
Double click on the data foundation to conduct the mapping. In the VBRK table, right-click on MANDT and add a filter for client=800 (this is for IDES). Right-click on NETWR and select add to output. Next join VBRK to KNA1 by connecting MANDT on VBRK to MANDT on KNA1. Also join KUNAG on VBRK to KUNNR on KNA1. Finally right-click in KNA1 on the NAME1 and add that to the output. Grab any other fields for the output that you may want to use such as SalesOrg.
-
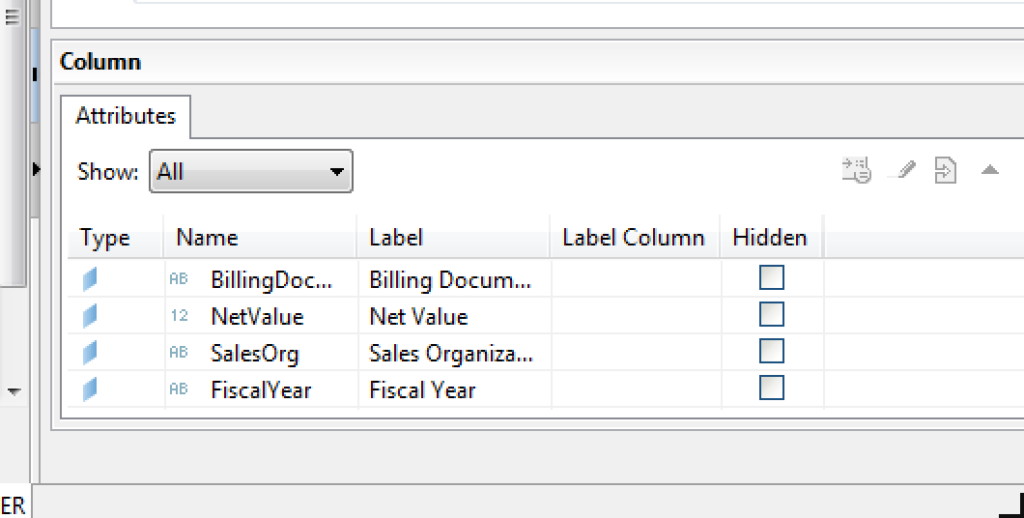
Next double-click on the Semantics section so we can rename some of these fields. Rename them something nice to the reader. For example, NetValue, CustomerName, SoldTo.
-
Once complete, click on the activate button for your attribute view. If you go to preview it now, you may get a permissions issue. If that is the case, running this from the command line may help: CALL “HCP”.”HCP_GRANT_SELECT_ON_ACTIVATED_OBJECTS”
-
You should now be able to preview your data:
Create an ODATA Service on the XSEngine
- Switch back to the SAP HANA Development View
- From your project, right-click on the project title and select file->new->other->SAP HANA->Application Development->XS OData File. Name this SalesByCustomer.
- In the file, insert the following text (replacing your user id, naming as required):
service {“p1054736trial.mindsetdemo1.SalesByCustomer::ATTRIBUTE_SD_BILLING_HEADER” as “SD_HEADER”key generate local “GenID”aggregates always (SUM of “NetValue”);}
-
Depending on your security, you may be able to run this right after activating. I had to do a few more things…
-
Create another file just like before, but choose the project, and choose new->File (blank file). Name this MODEL_VIEW.hdbrole. Insert the following text (changing id’s where appropriate): role p1054736trial.mindsetdemo1.SalesByCustomer::MODEL_VIEW {sql object p1054736trial.mindsetdemo1.SalesByCustomer::ATTRIBUTE_SD_BILLING_HEADER: SELECT;}
-
Go to the command prompt and execute (again changing to your user id and information): call “HCP”.”HCP_GRANT_ROLE_TO_USER”(‘p1054736trial.mindsetdemo1.SalesByCustomer::MODEL_VIEW’,’p1054736′)
-
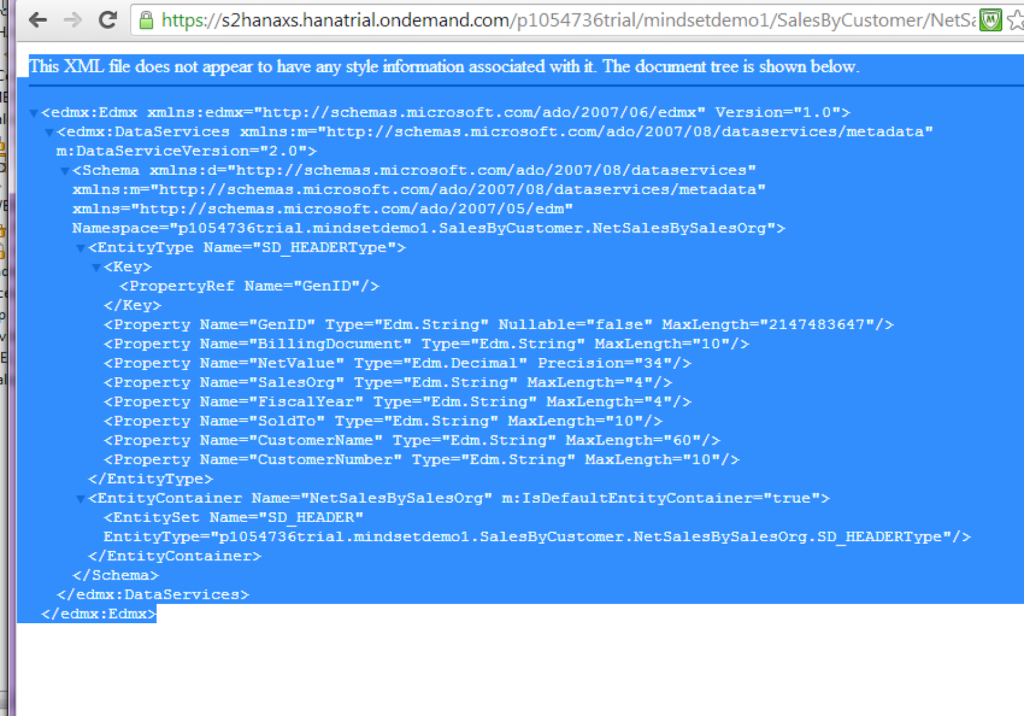
Now you should be able to test out the ODATA Service. If you go back to your HANA Cloud control panel, you can launch your app (see the previous blog). You can use the same URL, but switch it out for the XSODATA service you recently created: https://s2hanaxs.hanatrial.ondemand.com/p1054736trial/mindsetdemo1/SalesByCustomer/NetSalesBySalesOrg.xsodata/$metadata
Connect the ODATA Service to SAPUI5
- Let’s go back to our view and switch out the JSON Model, for the ODATA Model. Navigate back to the folder <project name>->Web Content->salesbycustomer->SalesByCustomer.view.js.
- Switch the JSONModel to instead read:
var oModel = new sap.ui.model.odata.ODataModel(“/p1054736trial/mindsetdemo1/SalesByCustomer/NetSalesBySalesOrg.xsodata”, true);
-
Comment out the setData() command.
-
Switch the bindItems to: myTable.bindItems({path: “/SD_HEADER”,parameters: {select: “NetValue,SoldTo,CustomerName”},template: tableTemplate});
-
Save and activate and test at the url (change to your ID) : https://s2hanaxs.hanatrial.ondemand.com/p1054736trial/mindsetdemo1/SalesByCustomer/WebContent/index.html
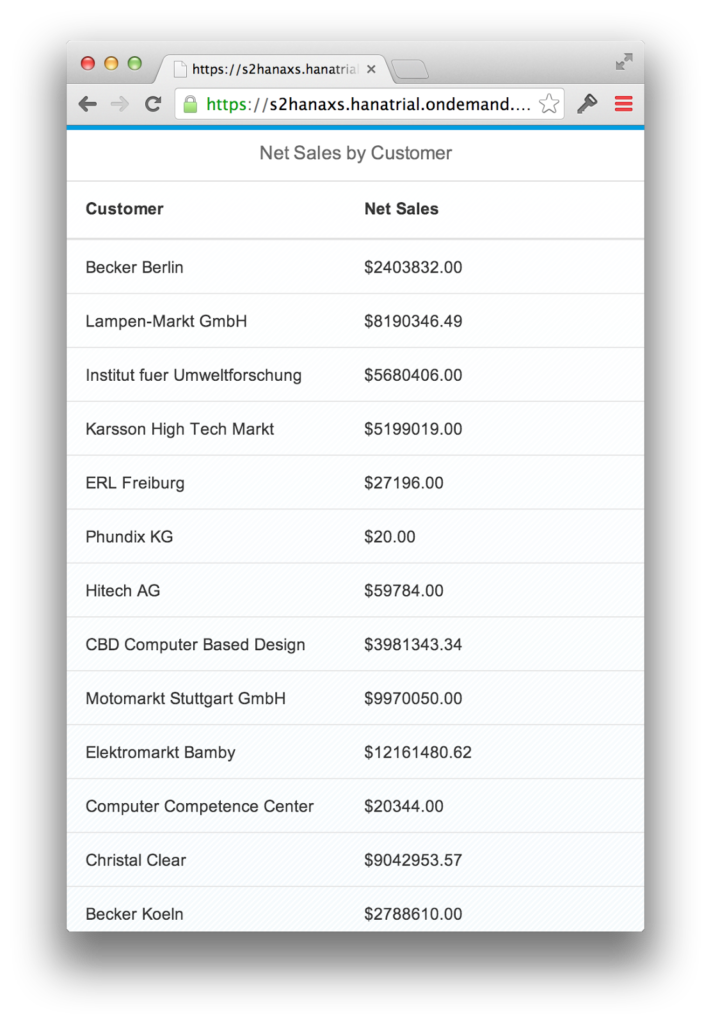
Now you have a live HANA SAPUI5 application reading ECC data. In part 3 of the blog, we will go to the final step of embedding this into a hybrid app for iPhone.
I’d like to give a big thanks to Karen Lindholm for providing amazingly quick and helpful guidance on the SD configuration. You can find her here: https://www.linkedin.com/profile/view?id=16936543&trk=nav_responsive_tab_profile
As always, you can connect with us, or see our solutions from: https://mindsetstg.wpengine.com/solutions.html
Appendix
The CreateContent function should now be:
createContent : function(oController) {
var oModel = new sap.ui.model.odata.ODataModel(“/p1054736trial/mindsetdemo1/SalesByCustomer/NetSalesBySalesOrg.xsodata”, true);
var tableTemplate = new sap.m.ColumnListItem({
cells : [
new sap.m.Text({ text : “{CustomerName}”}),
new sap.m.Text({ text : {
path: “NetValue” ,
formatter: function(net){
return “$” + parseFloat(net).toFixed(2);
}
}
})
]
});
var myTable = new sap.m.Table({
columns: [
new sap.m.Column({
header: new sap.m.Label({text:”Customer”, design: sap.m.LabelDesign.Bold})
}),
new sap.m.Column({
header: new sap.m.Label({text:”Net Sales”, design: sap.m.LabelDesign.Bold})
})
],
});
myTable.setModel(oModel);
myTable.bindItems({
path: “/SD_HEADER”,
parameters: {
select: “NetValue,SoldTo,CustomerName”
},
template: tableTemplate
});
var myPage = new sap.m.Page({
title: “Net Sales by Customer”,
content: [myTable]
});
return myPage;
}

Gavin Quinn
Gavin Quinn is the CEO and Founder of Mindset Consulting, a SAP Gold and AppHaus partner headquartered in MInneapolis, Minnesota.